WARNING! Backup your data often! BACKUP your log directory at the end of EVERY session! All that you need to backup and store in a safe place is the log database directory located in the ~/.config/cqrlog/database folder, or you can enable the autobackup function in Preferences. This autobackup function creates an ADIF file with a backup of your log.
[Menu]

CQRLOG for LINUX by OK2CQR & OK1RR

Keys and shortcuts

When "New QSO" window is active:

The "New QSO" is the logging screen!


2x ESC or Ctrl-F2 Empty all fields and prepare program for a new QSO
PgUp CW Speed +2 WPM (QRQ)
PgDn CW Speed -2 WPM (QRS)
F11 QRZ/HamQTH Callbook (call in the field)
Ctrl-1...Ctrl-9 Set split using XIT if rig supports it. Value 0 - 9999Hz UP/DOWN
Ctrl-9 will add random value 0 - 990Hz to setting. Subtract if split is DOWN
Keys work also when TRXcontrol window is active
Ctrl-0 Disables XIT
Key works also when TRXcontrol window is active
Ctrl-A Add the logged call sign and the actual frequency to the bandmap
Ctrl-D DXCC statistics - Confirmed only
Ctrl-H Show help
Ctrl-I Detailed info
Ctrl-J Remote mode for WSJT
Ctrl-K Remote mode for ADIF logger
Ctrl-L Change your QRA locator
Ctrl-M Remote mode for fldigi
Ctrl-N Show/edit long note
Ctrl-O QSO list (see below)
Ctrl-P Preferences
Ctrl-Q Quit (Close)
Ctrl-R Change ref. call
Ctrl-S Save DXCluster StartConnectionCommand
Ctrl-W or ` (back single quote) Send a spot to the DX Cluster
Ctrl-Z Scroll back DXCluster commands (5 stored)
ALT-F2 execute New QSO
ALT-B Memory down
ALT-F Enter frequency
ALT-H Show Help
ALT-N set QSL_S/QSL Send to N (N = No QSL/No paperQSL)
ALT-O Set operator call (stored until restart of cqrlog). To reset to configured callsign just set to empty.
ALT-V Memory up
ALT-W set QSL_S/QSL Send to SB (SB = Sending via Bureau)

When "QSO list" window is active:

The "QSO list" is the main screen for maintenance!


F1 Help (this file)
F2 New QSO
F3 View QSO
F4 Edit QSO *
F6 QRZ/HamQTH Callbook search
F7 Sort (setup sort order)
F8 Delete QSO *
F10 Go to menu
F12 Create filter
Shift-F10 QRZ/HamQTH Callbook/IK3QAR qsl manager page search (opens in browser)
Shift-F12 Cancel filter
Ctrl-D DXCC statistics **
Ctrl-F Search
Ctrl-H Show help
Ctrl-P Preferences
Ctrl-Q Close the QSO list window
Ctrl-R QSL received

WARNING! Use the Edit (F4) and Delete (F8) (marked with a red star) options only if you are sure, what you are doing! There is NO UNDO, so the operation cannot be undone!

Your DXCC statistics can only be rebuilt from the QSO list!

New QSO (online logging)

While logging online (during your QSO), date, start and end time are set automatically. Type the call into the dedicated box and move from this field with Arrow-Down key or spacebar (only if you enable it in the Preferences). The 'Frequency' and 'Mode' fields are skipped if you have properly set up the TRX Control. If you omit settting up the TRX Control option or if your radio does not allow Computer Aided Control (CAT), the Frequency and Mode fields are not skipped and must be filled manually, however you can use the pull-down menu to choose a corresponding default frequency in any band and the mode.

When the cursor leaves the 'Call' field, you will see your previous contacts with the logged station (if any). The number above 'Call' box marked 'QSO nr.' denotes the number of contacts you already have with the worked station (here, 130 QSO worked already with G3LIK, the 131st just being logged). The previously confirmed contacts are highlighted in red. If the station has a QSL manager, his call appears in the 'QSL VIA' field and an indication 'QSL manager found' is displayed. If the station wants QSL direct only, the 'QSL VIA' field remains empty but the red 'QSL manager found' warning is still displayed. Click the button at the right of the 'QSL VIA' field and a separate window with QSL managers appears, the correct address is highlighted.


Note, that if you move the cursor from the 'Call' field to the 'RST sent' field, the S in the RST is highlighted, making it possible to simply overwrite the corresponding number (S). The same applies to the 'RST rcvd' field.

This trick can speed up the QSO entering procedure. You can also move between fields with the TAB key but then the whole RST field is highlighted, so reports where more than a single character need to be overwritten (ie. 449) can be entered more easily. The default report is predefined in Preferences). Note, the RST field changes to its correct form (RS or RST) with mode.

The 'Start time' begins to run if you move the cursor to the 'RST rcvd' field. This means that you can set your RST without any hurry. Also, the QSO duration counter starts to run. It is just behind the time fields on the logging screen.

If the cursor leaves the 'Call' field, a lot of another details are displayed. If the location is exactly on an island with IOTA reference number, it is displayed in the IOTA field. If the call represents more IOTA refs., the IOTA designator above its field became red. Click the button on the right side and a pull-down menu with all possible IOTA references is displayed.


CQRLOG also displays the usual data like exact QTH description (including province, regions, call districts etc.), WAZ and ITU zones, continent, DXCC reference, geographical coordinates (in decimal form), distance, azimuth (direction), date and local time of the target point and the salutation corresponding to the local time (GM, GE etc.).


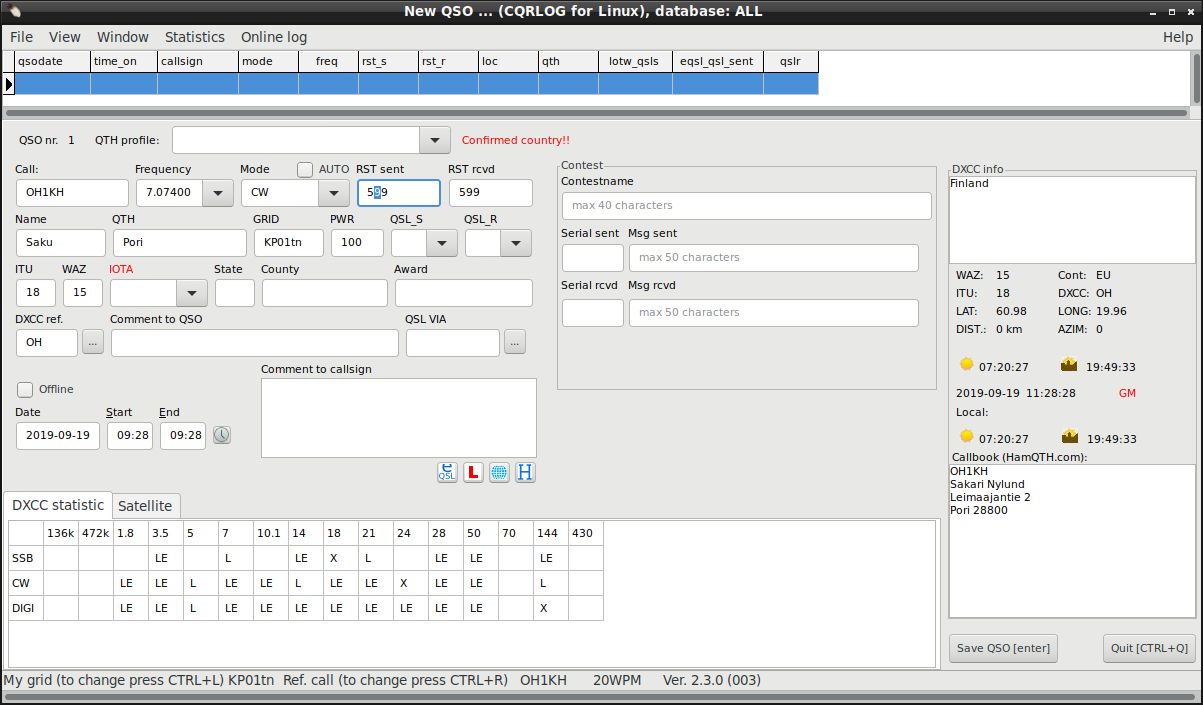
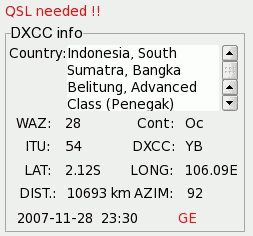
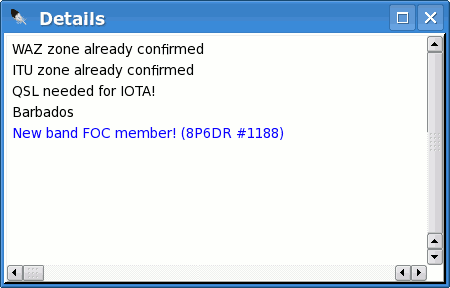
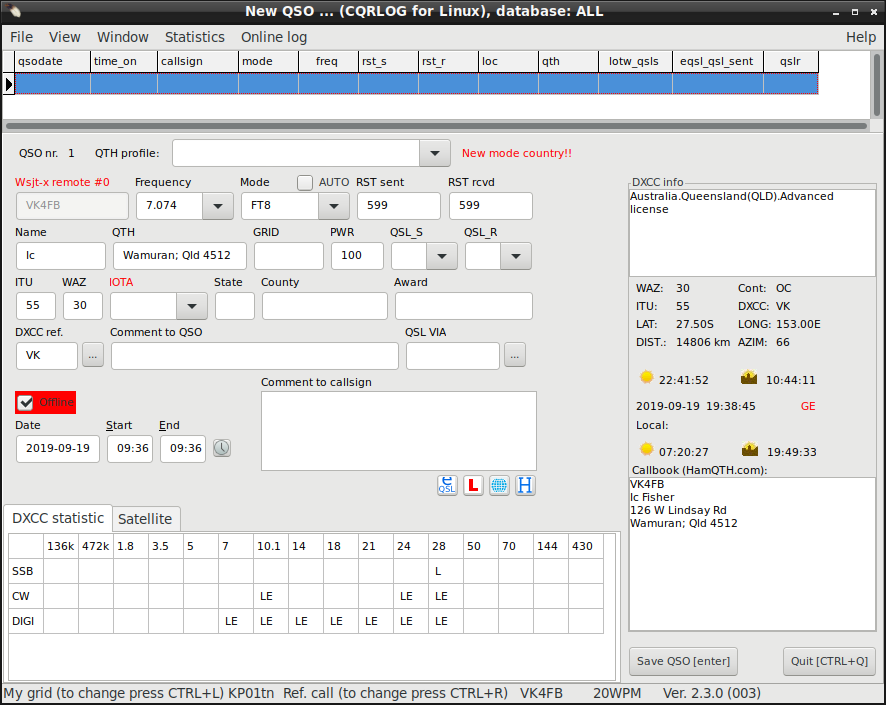
Details window dispays details about new/confirmed zones, IOTA details etc. You can open it from NewQSo/Window/Details or with Ctrl-I key.


German DOK: When entering a german callsign the field State will switch to DOK. Here you can enter the german DOK of the station. You can, too, click on the label 'State' or 'DOK' and the field will toggle between State and DOK. Only letters and numbers are valid and a maximum length of 12 character due to special DOKs (in german "Sonder-DOK").
You can use the Statistic for DOK. You can export or import it via ADIF Files. When in Preferences - Callbook support the option HamQTH.com is enabled, the DOK is filled when available. QRZ.com does not support DOK.

Contest section in NewQSO window is for editing logged qsos, not for entering contest qsos. This part is only visible if contest window is active.

You can add a general long note to your log with the Ctrl-N key (from the logging screen or from the 'File' menu option).


Ctrl-N opens a new dialog window where you can add or edit your note. This note is not related to any record, it is just a notepad allowing operations with your notes which are stored in your log database.


If you check Preferences/New QSO/Enable satellite mode you get a new tab where you can enter satellite name, rx frequency and propagation mode. There are several propagation modes that you can select, not only "SAT" so this is usefull also when keeping record of non satellite contacts.
You can make the DX spot function use the RX frequency of this tab if you enable the checkbox "Use RX frequency for DX spots".


The tab "LO Config" gives you an option to configure frequencies of a local oscillator. These values are added to the "Frequency" field in the QSO window. If the RX LO is activated the RX frequency is derived from the TX frequency and synchronized to the field "RX frequency" in the "Satellite" tab.


If a call sign is entered, the grayline map displays a line from your QTH to the target point.


Note: The yellow line on the grayline map has nothing to do with actual beam heading nor the actual path! The purpose of this line is to indicate if the path goes from/to day or night areas.

Status line


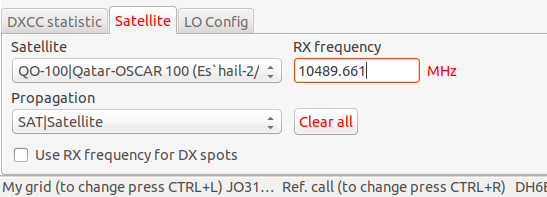
Here your own QRA locator is displayed which can be changed using Ctrl-L (important mostly for VHF freaks who forget to change the QRA locator in the QTH profile). In the next column is the reference call sign (the core of a slashed call, ie. KH6/OK2CQR). You can change it using Ctrl-R. The purpose is to provide the possibility of changeing the reference call if a correction of membership needed. The second column also shows the operator call if it is set to a different call than what is configured as station callsign in preferences. You can change the operator call tempoarily using the key combination ALT-O. The new operator callsign is stored until restart of cqrlog. To manually reset the operator call back to the station callsign just set an empty value. The number in the right corner denotes the CQRLOG version.

New QSO (offline logging, ie. from paper log etc.)

To switch to the offline mode, check the 'Offline' box above the date. To indicate that you are offline, the box with the 'Offline' description became red framed.


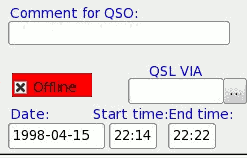
Basically, offline logging is the same as online logging, however there are some differences. The 'Frequency' and 'Mode' fields are not skipped. You can enter the exact frequency or choose a default (for each band) from the pull-down menu. The same applies to the mode.

You also need to enter the 'Date' and at least the 'Start time'. The date format is YYYYMMDD and you can enter it without dashes, ex. 26. May 1994 can be entered as just 19940526. The dashes are added automatically. The same applies to the time which can be entered without the colon.

The CAT (radio computer control) is turned off. Other fields and log actions are the same. If you uncheck the 'Offline' box, CQRLOG returns to the online mode.

Digital modes

CQRLOG employs fldigi by Dave Freese, W1HKJ and WSJT-X by Joe Taylor, K1JT. We believe that these are the best digimode softwares available.

The most important thing is a proper setup of the remote mode. For fldigi you have 2 different ways to setup remote .
For wsjt-x, setup is done at same tab of preferences as fldigi. For operating with wsjt-x see: Wsjt-x operation

To use fldigi, CQRLOG must be switched to Remote from the menu File -> Remote mode for fldigi(or Ctrl-M).
To use wsjt-x, CQRLOG must be switched to Remote from the menu File -> Remote mode for wsjt.
To use ADIF logger, CQRLOG must be switched to Remote from the menu File -> Remote mode for ADIF logger.


The logging screen changes to indicate that CQRLOG is now working in 'Remote mode!' and can be controlled either from fldigi or can "dictate" the mode and frequency and fldigi now serves as the remote input device.
With wsjt-x the text 'Wsjtx remote ' includes also last received datagrams number and changes color in every receive to easily see that UDP link is alive between cqrlog and wsjt-x.


Now, use fldigi in its normal way and your contacts will go directly to CQRLOG. See fldigi help and the Beginners Guide on the W1HKJ site strong>http://www.w1hkj.com/beginners.html.

[Menu]